
Moderating Live Group Chat with Video Activities
Leading up to the start of your live group chat with video, participants can click into the Activity and will be kept in a waiting room. Anyone who will be participating in a live video meeting should be encouraged to run a System Check several minutes prior to the scheduled start time to ensure their camera and microphone are working.

If you have enough or all people in the waiting room, you can choose to start the Activity by simply clicking the Start Early option (if it's at or past the start time the button will read Enter Activity). Everyone joining the front room of the meeting will be prompted to share their camera and microphone when they join.
The audio and video recording will begin immediately once an Analyst or Moderator has started the Activity.
Waiting Room
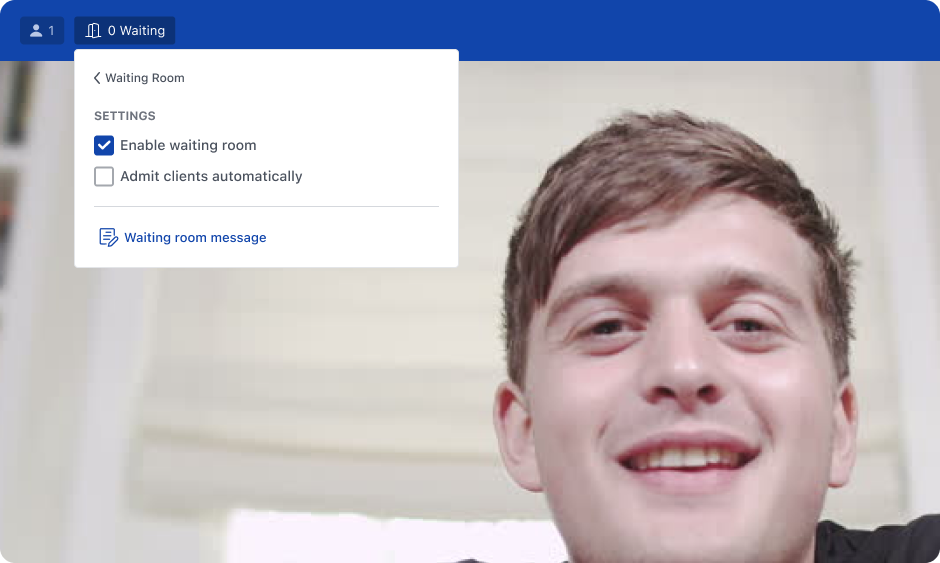
If the Waiting Room is enabled during Activity Setup, instead of joining the session immediately, users are placed in a Waiting Room until they are admitted by an Analyst or Moderator. While in the Waiting Room, users see the configured custom welcome message indicating they’ll be admitted shortly. If no custom message has been configured, a default system message will be displayed. Once admitted, Participants enter the front room while Clients enter the backroom. Admins can also configure whether clients should be admitted automatically or require manual approval.

Meeting Interface
Once in the meeting, a number of settings and options are integrated into the interface for easy access:

1. Audio Channel Controls
Live Activities can have multiple audio channels, such as a backroom with observers or a channel for simultaneous translation. This button allows you to determine which channels you would like to hear. You can also select the Adjust Volume option to set custom volume for each available channel individually.
2. Microphone
This button can be used to toggle your microphone on and off, or, to change your audio input or output device. Users can manage both microphone and speaker output from this control menu for improved audio quality and reliability. Users can also use the Test Speaker option within the device selection menu to verify their audio output upon joining.
3. Camera
This button can be used to toggle your camera on and off during the meeting, or, to change which camera you are using.
4. Screen Sharing
Hosts can use this button to share their screen with participants or request that participants share theirs. Once screen sharing is enabled, the user sharing their screen will have the option to choose whether to share their entire desktop, a specific application window, or even a tab within an application window.
Click here for a more detailed look at the Screen Sharing feature and how to use it.
5. Meeting Chat Toggle
The meeting chat toggle can be used to open or close the chat. When the text-chat area is hidden, the icon will indicate when someone else is typing and when a new unread message has been sent. The chat message will also appear on screen as an overlay.


6. Meeting Chat Window
The meeting chat can be used to communicate in writing with the participants, share prepared content, or communicate with members of the backroom using the backroom tab within the chat window. The chat window will automatically open on the right side of your screen. You can use the pushpin icon in the upper right-hand corner of the window to pop out the chat in a floating window (the same icon can be used to snap the chat back to the right as well).

Click here for a more detailed look at posting prepared content.
7. Backroom Chat tab
Click on the Backroom Chat tab to toggle between the Front room chat and the backroom chat. The front room is visible to everyone in the meeting including participants. The backroom is only visible to administrators. If you receive a message within a tab that you do not currently have open, a number will appear on that tab to indicate the number of new messages you have not viewed yet.
8. Having Issues?
If a user is experiencing technical difficulties during a live meeting, they can click on Having Issues? to launch troubleshooting procedures. The user can choose between refreshing their page to re-join the meeting, or, running a System Check to diagnose their issue.

9. Participant Menu
This is where you can see everyone who is in the meeting, as well as their status. From here, you can select an individual to reveal a series of interactions with that user (e.g. remove from chat, direct message)

Hosts have the ability to force mute meeting participants. The MUTE meeting control will mute all participants, while hovering over a participants name in the Menu will surface a microphone icon and the option to mute just that participant.
10. Exit Activity
This button can be used to exit or end the meeting. Exiting the meeting will only impact you, as the meeting will continue to run in your absence. If you choose to end the meeting, a 2 minute countdown will begin, during which time you can choose to resume the meeting if needed. After the 2 minutes, the meeting will end permanently and all attendees will be removed.

11. Waiting Room Controls

Analysts and Moderators can manage the Waiting Room from both the front room and backroom during a live session, using the Waiting Room menu. This menu displays all users currently waiting to join, allowing Analysts and Moderators to admit or deny users individually or in bulk. Participants and clients can be managed separately, making it easy to control the order in which users enter the session.
Waiting Room settings can be updated during the meeting by Analysts and Moderators, including enabling or disabling the Waiting Room, changing automatic client admission behaviour, or editing the welcome message in real time.
Backroom Access
Analysts and Moderators: When entering a Live Group Chat meeting with video, a meeting entry page greets all users. It allows them to adjust their camera and microphone prior to entering the room. Analysts and Moderators can select the Backroom Observer role if they wish to attend the meeting as a silent observer instead of as a Host.

Clients, Translator and Observers: Clients will only be permitted to join a Live Group Chat if the Client Permission to Collaborate in backroom is enabled. When this permission is enabled, Clients will have the option to join the backroom, but not the front room. Simultaneous translators can also join meetings. Translators should be invited to the study with the Client Admin role, and should choose the Translator role when joining.
When Admit clients automatically into the backroom is enabled, clients who refresh or rejoin the meeting return directly to the backroom without re-entering the Waiting Room.

At no time will participants be made aware of the backroom observers. Administrators and Clients in the backroom can communicate via text chat or via the backroom audio channel if enabled. When backroom audio channels are enabled, the meeting hosts and backroom users will be permitted to set the desired volume for each channel. You can review our Backroom Audio Channels knowledge base article for more information.

Viewing Modes
During a Live Group Chat meeting with video, users can choose between two viewing modes: Gallery and Spotlight. The View menu which allows you to toggle modes will appear in the top-right corner. Users on mobile devices will start in Spotlight mode but can swipe right to view the Gallery.

In both modes, administrators have white name tags with gold writing and participants have black name tags with white writing.

By default, names will persist throughout the entire meeting. If you prefer a more minimal view, you can disable this from the View menu.
Viewing Mode: Gallery
In Gallery mode, everyone's video is shown the same size in a grid layout. The quantity of people seen at once depends on the person's screen size and their performance profile (performance profiles are described below). If there are more people in the chat that can fit on one screen, a control appears to navigate to the next page. Your own video will always appear in the top-left corner and people will be highlighted as they speak. Administrators, participants sharing their video and users that actively speak, will more often be featured on the first page.

Viewing Mode: Spotlight
In Spotlight mode, the active speaker is featured as a larger video and will change as people take turns speaking. Everyone listening is shown as a single row of videos along the top of the page. Your own video will always appear in the top-left corner. If there are more people in the chat that can fit in the top row, a control appears to navigate to the next page.

Performance Profiles
People's experience may vary based on their device and available bandwidth. If their bandwidth is low, some videos may be paused automatically to allow the active speaker to be clearly featured.
If a user sees very few videos, despite everyone sharing their cameras, it's an indication that their web browser is struggling to load all the videos at the same time. When a video is paused to save bandwidth, it is indicated with an icon and will not interrupt the person's audio.

A user in the chat can improve performance in one of two ways:
- Switch to the Spotlight mode as it is less demanding
- Select a lower Performance Profile to reduce the number of videos shown at once
The Performance Profile is a setting that appears in the top-right corner (a laptop icon with a number). The initial Performance Profile for each user in the chat is selected automatically based on the person's device and their role in the meeting.
The number in the profile reflects how many videos will be shown concurrently. For example, the "Medium" profile shows a "9". That means it will display your own video plus those of 8 more people on the same page.
Even when the number is low, a user can navigate to the next page to see more people. The videos of those on the additional pages will appear after a short delay.

There are four Performance Profiles available:
- Low (4 videos shows at once): Default for those on mobile devices (iOS or Android)
- Medium (9 videos shown at once): Default for participants using Apple macOS
- High (16 videos shown at once): Default for admins on any platform and for participants on Windows
- Full (25 videos shown at once): This profile is never selected by default but can be enabled by those that feel confident they have a strong Internet connection and a computer that can handle more intense video processing.
Note that macOS users start at a lower profile by default due to the lack of hardware acceleration for the VP8/VP9 video format. This video format, also known as a "codec", is the industry standard for live video on the web (WebRTC).
Troubleshooting in the moment
- Close their browser entirely
- Restart their browser
- Return to Recollective and re-enter the meeting
- There is another administrator in the backroom
- You don't actually "end" the meeting when rebooting, just close the window. (If the meeting officially “ends” prematurely, the only way to resume is to reschedule with the participant for a different day or time, so we want to avoid this!)

Restarting the web browser will solve most audio and video issues. If a browser restart does not solve the issue, the user experiencing the issue should
- Try an alternate browser
- Try an alternate device
- Try an alternate network connection
If these steps do not resolve the issue, the user should run a System Check to diagnose the problem. Select the Having Issues? button to run a System Check directly within a meeting. The Having Issues? button will only be visible to a user if and when performance issues have been detected.